Select a space for instructions on operating and troubleshooting A-V equipment


KENNY HALL
How to…
1: Check out the microphone from the reception desk
- There are two types of microphones available for you: a handheld microphone, and a headset microphone.
- If you need more than one of a certain kind of microphone (i.e. two handhelds), please reach out to your ministry leader, or to our AV team at av@ctking.com.
2: Turn the microphone on using the switch on the front
- You will see a switch on the microphone. Push that UP.
- Once you see the small screen lit on the microphone, test your voice.
- The microphone should be pre-set at the proper level. If it sounds great, you are good to go!
3: Adjust the volume
- First see what it sounds like holding the microphone at different distances from your mouth.
- If it doesn’t sound the way you want regardless, you may use the touchpad to adjust the volume.
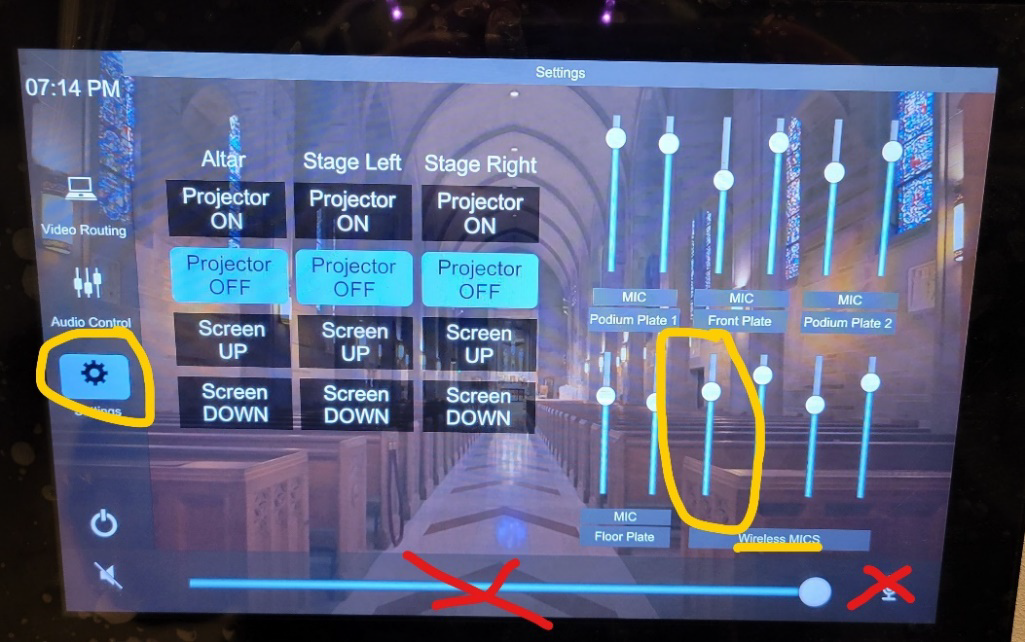
- Open the touchpad by touching anywhere on the screen. (Currently, there are no passwords)
- On the “Settings” tab, you will see four level control in the bottom right of the screen, above the word “wireless microphones.” The first of the four is for Microphone A. (refer to the image below)
- Place your finger on the digital controller to drag the volume up or down as needed.
4: NOTE:
- You can monitor the battery level on the small screen of the microphone. In theory, it should always be full, because it should go back on the charger in the office. But if it is dying, go grab the other microphone in the office.
- The large volume control at the bottom of the touchpad does NOT control the microphones, only the audio/video.
- The button in the very bottom right corner of the touchscreen MUTES the microphone. If you aren’t hearing sound, that might be why.
5: Return the microphone when finished
- Please sign out, and remember to put it back in the charging port for the next user!
1: Connecting your device
- Plug in your computer (or other device you intend to project images) via an HDMI cord into one of the HDMI input ports in the wall.
- You may use check out an HDMI cord from the reception desk downstairs if you do not have your own with you.
- There are three HDMI input ports available to you:
1) To the left of the stage (when facing the stage). This is the best place to connect if you are controlling a slideshow during a stage presentation.
2) Near the entrance doors to Kenny Hall; in the “back” of the room (when facing the stage)
3) In the closet behind the ambo/altar, to the left of the altar. This is the best place to connect if you are controlling a slideshow during a presentation while the audience is facing the altar. This is also a good place to connect if you are mainly playing music and want the computer out of site.
2: Turn on the Extron touchpanel
- This is on the wall by the counter, to your left when facing the altar.
- Just touch the screen; no password.
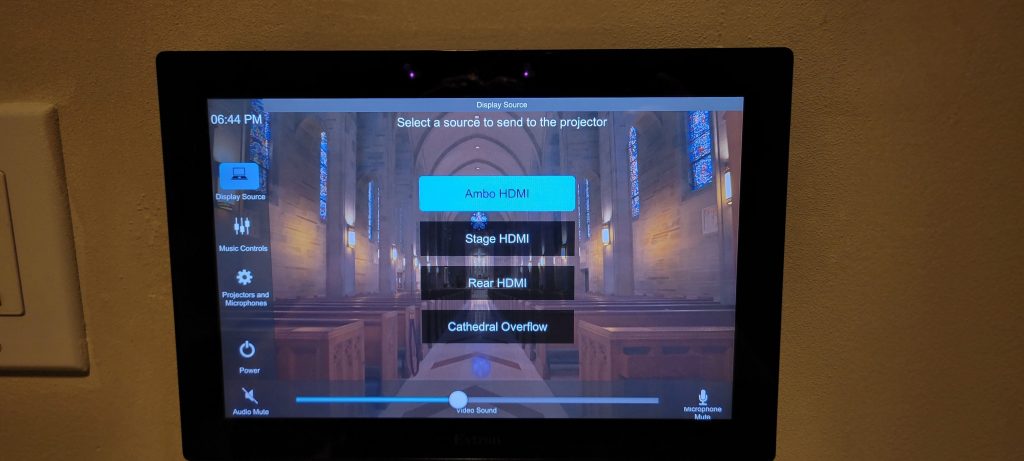
3: Choose your display source
- On the left hand side of the screen, select “Display Source”
- Select the source to send to the projector, based on where you have connected your device
- Ambo HDMI –> closet behind the altar
- Stage HDMI –> wall on the stage
- Rear HDMI –> wall by the entrance doors
- Whichever source button is blue is where the projectors are pulling from.
4: Turning on the projector(s)
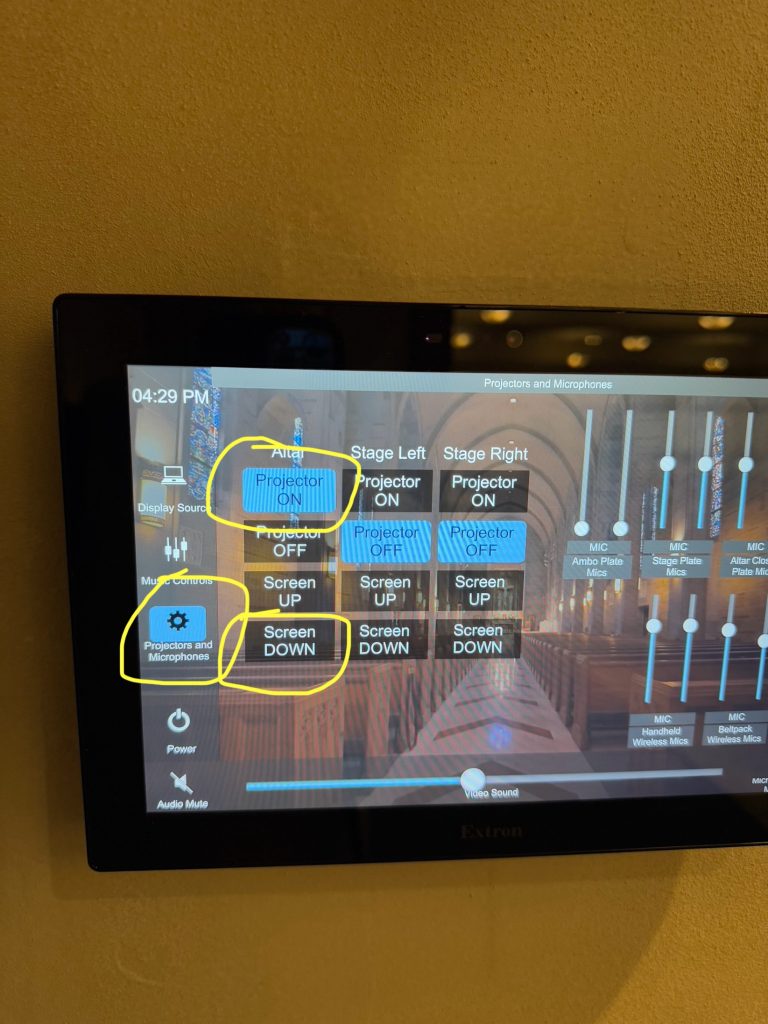
On the left side of the screen, select Projectors and Microphones
On this page, hit the Projector ON button under the corresponding projectors you’d like to use for your display.
Also hit the Screen DOWN button under the corresponding projectors to lower the projection screens
NOTE: It may take one or two minutes for the projector to fully turn on.
5: Using Audio
- If you plan to use audio, such as playing a video or playing music from your computer, you can control the sound using the long blue fader at the bottom of the touchpanel screen labeled “Video Sound”
- NOTE #1: Your computer audio will ALSO control the sound, so make sure the volume is ON and set at a good level on your computer, in addition to controlling the audio via the touchpanel.
- NOTE #2: The Audio Mute button in the bottom-left of the touchpanel screen will mute the sound. If it is RED, it means it is muted.
6: If you can’t see the image on the projector (TROUBLESHOOTING)
- Make sure the HDMI cable is not loose, either in your computer, or in the plug in the wall.
- Make sure your computer settings are all correct.
- Here are some helpful instructions for PCs
- Here are some helpful instructions for Macs
- Make sure the display source has been properly selected on the touchpanel
- Sometimes it takes a couple of pushes on the touchpanel screen for the proper source button to highlight
- Make sure the projector actually turned ON via the touchpanel
- Sometimes this also takes a couple of pushes on the touchpanel screen.
- If none of these steps work, reboot the system (instructions below)
7: Shut down the system when finished
- The most easy and effective way to do this is hitting the Power button on the bottom-left side of the touchpanel screen
- Please return any cords you checked out. Thank you!
Mass Overflow in Kenny Hall
- Turn on the touchpanel
- It is located on the wall towards the northwest corner of the room.
- There is no password, just touch the screen.
- Turn on the projector
- Tap Projectors and Microphones on the left-hand side of the screen.
- On this page, hit the Projector ON button under the Altar label.
- Under the same column, hit the Screen DOWN button.

- Turn on the overflow feed
- Tap Display Source in the upper left corner of the screen.
- Hit the Cathedral Overflow button.
- This will bring up the feed from the livestream cameras.

- Adjust audio as necessary
- Adjust the livestream feeds volume with the blue fader at the bottom of the touchscreen. Press and hold the white button and move from left to right.
- Moving the white button to the right turns the volume UP, and moving it to the left turns the volume DOWN.

- When finished, please shut down.
- Shut down the AV system by hitting the Power button in the bottom left side of the touchpanel screen.

Instructions for playing background music in Kenny Hall
These instructions are on the way! In the meantime, you can ask any question to our A/V Support team at AV@ctking.com
If your question is not answered on this page, please reach out to A/V support.
MULTI-PURPOSE ROOM
How to…
CONFERENCE ROOM 1 & 2
How to…
CAFETERIA
How to…
GYMNASIUM
How to…
Setting up the microphones for Sunday Mass in the Hyland Center
Step 1) – Set the Hyland system via Touchscreen
- Turn on touch panel on the counter in the AV booth.
- Password is “1962.”
- Select the preset button “Audio Gym Floor”

Step 2) – Antennas
- Make sure window is open and antennas are hanging out to pick up signal
Step 3) – Turn on the Mixer
- There is a key in the front that turns to the right. This amp powers up the microphone receivers and the mixer board.
- If the board does not turn on after a minute, check the power button that flips up in the back.

Step 4) Set the mixer to mass audio settings
- Once the board is on, touch the button in the bottom right of the screen.
- On the page that pulls up, select “033 Sunday Mass.”
- Once selected, hit “RECALL.” This will bring up the Sunday mass preset settings on the board (you will likely see a few faders move).
- Do NOT hit “STORE” because that will override the preset settings and save to whatever the board is currently set as.

Step 5) – Prepare the Microphones
- Pull out the microphones from the white plastic cabinet: the belt-pack labeled WL-2, and the two handhelds labeled WL-3, and WL-4.
- Replace the batteries with the ones that are charging in the charger in front of the Cabinet.
- WL-2 is for the priest, WL-3 is for the ambo (podium), and WL-4 is for the singer.
- When the batteries are replaced, turn them on to test to make sure there is sound.
- Adjust the volume on the faders as necessary.
- If not hearing sound, make sure the red ON buttons are lit up.

Step 6) – Take the mics to the floor
- WL-2 can go on the presider chair
- WL-3 in the stand attached to the ambo (podium)
- WL-4 in the stand by the piano.

Step 7) During mass
- Adjust the volume as necessary throughout mass. Every lector, priest, and singer are different, so while the preset mass settings are a good starting point, it’s good to make minor adjustments during mass, especially during the first 10 minutes.
- If you really want to go above and beyond, try muting the mics that are NOT being used during each part of mass. For example, muting the singer’s mic (WL-4) during the readings.
Step 8) After mass
- Bring up the three mics after mass. You may need to chase down the priest if he forgets to take off his mic! 😉
- Put the batteries back in the charger.
- Hit the “Shut down” button on the touchpanel.
- Pull in the antennas and close the window.
- Turn off the board and mics turning the key back to the left for OFF
- After making sure you have all of your personal belongings, turn off the lights, and lock the door on your way out.
- Enjoy your the rest of your Sunday!
These instructions are on the way! In the meantime, you can ask any question to our A/V Support team at AV@ctking.com
These instructions are on the way! In the meantime, you can ask any question to our A/V Support team at AV@ctking.com
Playing music from a computer in the Hyland Center Gym
- Turn on the system
- After unlocking the AV booth, you turn on the system with the touchpanel on the counter.
- The Password is 1962
- Select AUDIO GYM FLOOR

- Turn on the Audio board
- Turn the key on the right side of the power amp from OFF to ON. The amp is located about halfway down the rack that has the wheels.
- If the board does not turn on within a minute after turning on the amp, check the power switch on the back of the board, and flip up to turn on.

- Select the Background Music preset
- On the touchscreen located in the center of the audio mixer, select the square in the bottom-right corner of the screen. It will likely say something like “Scene 033 Sunday Mass.”
- This will bring you to the menu with multiple “Scenes,” which are all different presets.
- Using the knob labeled “TOUCH AND TURN” you can scroll on the screen until you have highlighted “025 – Bg Music.”
- Once highlighted, hit the button that says RECALL. You will likely see knobs on the board move when you do this. This is a good sign–it means the Background Music preset is on.
- Do NOT hit the button that says STORE.
- This preset has all other microphones and channels OFF/DOWN, and turns ON/UP Channel 12, which is the channel your background music will be coming through.


- Plug in your device
- Before you plug anything in: You should see the knob on channel 12 moved up to “0,” and the ON button should be lit up as red. I recommend turning the ON button off (which mutes the channel) to avoid a popping sound in the speakers when you plug in to your computer or phone.
- Once the channel is muted, find the gold “whirlwind PodDI” box on top of the audio mixer rack. One side should have an XLR cable already connected to the back of the mixer, and the other side should have an auxiliary audio cable coming out of it.
- Plug in the audio cable to your computer or phone.
- Check to make sure the switch on the box is to the side labeled “GND.”
- You should now be able to hear your music! Adjust the volume settings on your computer and your music software, as necessary. You can adjust on the board as well, but it should be set at a good level already, so I’d recommend adjusting your computer first.


- To have music spill over into the Multi-purpose room
- Turn on the AV system in the room with the touchpanel located to the right of the white board.
- The Password is 1962
- Select the button FROM GYM as the projection source.
- You may turn off the projector but keep the audio by hitting DISPLAY and turning the projector OFF.


- Please shut everything down at the end of the event
These instructions are on the way! In the meantime, you can ask any question to our A/V Support team at AV@ctking.com
MINISTRY OFFICES
How to…
Playing music from a computer in the Hyland Center Gym
- Turn on the system
- After unlocking the AV booth, you turn on the system with the touchpanel on the counter.
- The Password is 1962
- Select AUDIO GYM FLOOR
- Turn on the Audio board
- Turn the key on the right side of the power amp from OFF to ON. The amp is located about halfway down the rack that has the wheels.
- If the board does not turn on within a minute after turning on the amp, check the power switch on the back of the board, and flip up to turn on.
- Select the Background Music preset
- On the touchscreen located in the center of the audio mixer, select the square in the bottom-right corner of the screen. It will likely say something like “Scene 033 Sunday Mass.”
- This will bring you to the menu with multiple “Scenes,” which are all different presets.
- Using the knob labeled “TOUCH AND TURN” you can scroll on the screen until you have highlighted “025 – Bg Music.”
- Once highlighted, hit the button that says RECALL. You will likely see knobs on the board move when you do this. This is a good sign–it means the Background Music preset is on.
- Do NOT hit the button that says STORE.
- This preset has all other microphones and channels OFF/DOWN, and turns ON/UP Channel 12, which is the channel your background music will be coming through.
- Plug in your device
- Before you plug anything in: You should see the knob on channel 12 moved up to “0,” and the ON button should be lit up as red. I recommend turning the ON button off (which mutes the channel) to avoid a popping sound in the speakers when you plug in to your computer or phone.
- Once the channel is muted, find the gold “whirlwind PodDI” box on top of the audio mixer rack. One side should have an XLR cable already connected to the back of the mixer, and the other side should have an auxiliary audio cable coming out of it.
- Plug in the audio cable to your computer or phone.
- Check to make sure the switch on the box is to the side labeled “GND.”
- You should now be able to hear your music! Adjust the volume settings on your computer and your music software, as necessary. You can adjust on the board as well, but it should be set at a good level already, so I’d recommend adjusting your computer first.
- To have music spill over into the Multi-purpose room
- Turn on the AV system in the room with the touchpanel located to the right of the white board.
- The Password is 1962
- Select the button FROM GYM as the projection source.
- You may turn off the projector but keep the audio by hitting DISPLAY and turning the projector OFF.
- Please shut everything down at the end of the event
These instructions are on the way! In the meantime, you can ask any question to our A/V Support team at AV@ctking.com
These instructions are on the way! In the meantime, you can ask any question to our A/V Support team at AV@ctking.com
These instructions are on the way! In the meantime, you can ask any question to our A/V Support team at AV@ctking.com